Message Templates
Templates are a way to separate the presentation of your messages from the data used to personalize them. These can be altered at any time and you won’t have to re-deploy your application to change their appearance.
Creating a Message Template
The “Message Templates” tab is where you will find any templates that you have defined for your application. All new accounts are provided with a sample you use either as an example, or to customize as required. One template can make use of another so you can define an overall theme in one template, and then lay out several different types of content in others.
The “Create a New Template” link is where you create a new type of message. There are several key fields here that need to be populated in order to send properly formed emails.
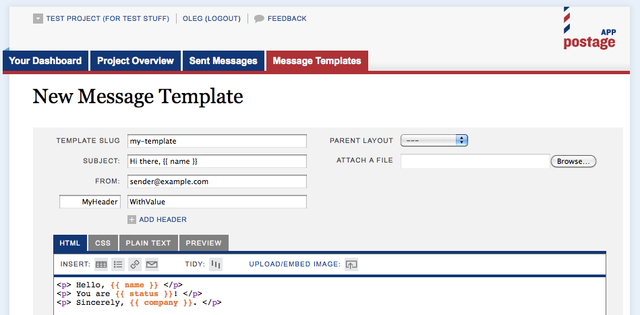
The template slug defines the internal name of the message, and this is the name you will use when sending messages through the API. Since this name can only contain letters, numbers, dashes and underscores, try and keep it as simple as possible.
The parent layout is how you use a style defined in another template. This has the effect of wrapping the content defined in this template with another, an easy way to add a consistent header or footer to your messages. A parent template must be defined with a sub-template tag {{*}} or it will not show up in this listing.
The subject field is where you can define the default subject line for this message. Although you can over-ride this when using the API, it is often easier to define the general format here. You can use template variables in the subject.
The from field is how you define where the message will show up as having been sent from. This is also where any replies to the messages you send will go. Note that this is different from the actual sender address, something that is defined on a project-by-project basis. It is the sender address that will receive failure notifications for the message. This needs to be a properly formed email address, and while it should be able to receive reply emails, this is not strictly required.
You can also add other custom headers as required using the “Add Header” option. A CC: or BCC: field can be added here although it will have no effect on who receives the message. If you need to receive a copy of all messages sent through the system, this can be done by adding yourself as an additional recipient on all API calls to send a message. Custom headers only have a cosmetic effect on your sent messages.
You can also add attachments to your messages. Although there is a limit on the size of these attachments that depends on the type of account you have, there is no limit on the type of attachment.
The content of the message can be defined in several different formats. The most common is HTML as it allows for the most flexibility in terms of display. Keep in mind that HTML for email messages is significantly more restricted than HTML for web pages as most email clients are very particular about the type of content they will render. For instance, you can only use inline CSS, not external stylesheets or a <style> block.
PostageApp allows you to define your stylesheets in a separate CSS tab to help simplify your design and keep your HTML as tidy as possible. These styles are applied to your message and rendered in an email-compatible inline format when it is sent or previewed.
You can also create a plain-text version of your message for email clients that are not able to display HTML. For some simple messages you can forgo the creation of HTML and stick to plain-text if that is easier, but at least one of the formats must be defined for the message to be valid.
The preview will allow you to see how your message is likely to appear in an email client. Although this is not always an accurate representation, and is no substitution for actually testing it with a real client like Outlook or Gmail, this is much faster than having to send a test message to yourself. The content of your message is analyzed for common CSS and HTML issues you may encounter when you send this to your application’s users, and warnings that indicate potential trouble are shown here. These are only suggestions, though.
Before you can send any mail with this template, you need to save it first. One option is to save and send a test message which helps to streamline the design process.

Using Message Templates with API Calls
{
  "api_key" : "PROJECT_API_KEY",
  "uid" : "27cf6ede7501a32d54d22abe17e3c154d2cae7f3",
  "arguments" : {
    "recipients" : {
      "recipient@example.com" : {
        "name" : "John Doe",
        "status" : "awesome"
      }
    },
    "template" : "my-template",
    "variables" : {
      "company" : "PostageApp"
    }
  }
}
Notice that we didn’t have to specify content of the message. This is because it’s already defined in the template.
Also it’s worth noting that anything in the API call will take precedence over whatever is defined in the template. So, if API call sends a subject header, it will overwrite one from the template.
Nesting Message Content from an API call in a Message Template
There’s a special variable/token that is used to nest templates: {{*}}. You can use this also to nest content coming from your API call.
Let’s say you have a template with the following content:
Hi, {{name}}. Here's a message for you: {{*}}
If you send an API call like this:
  {
    "api_key" : "PROJECT_API_KEY",
    "uid" : "27cf6ede7501a32d54d22abe17e3c154d2cae7f3",
    "arguments" : {
      "recipients" : {
        "recipient@example.com" : {
          "name" : "John Doe"
        }
      },
      "template" : "my-template",
      "content" : "Great news everybody!"
    }
  }
Final email will be this content:
Hi, John Doe. Here's a message for you: Great news everybody!
For a explanation of the various template features, visit the template documentation.